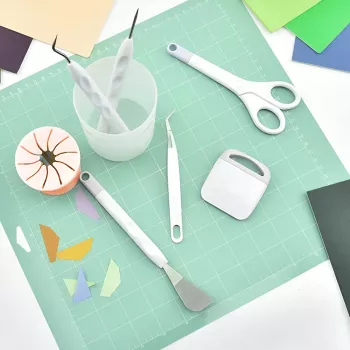
Fromthenon Carving Kit: Tools for Clean Sticker Cuts
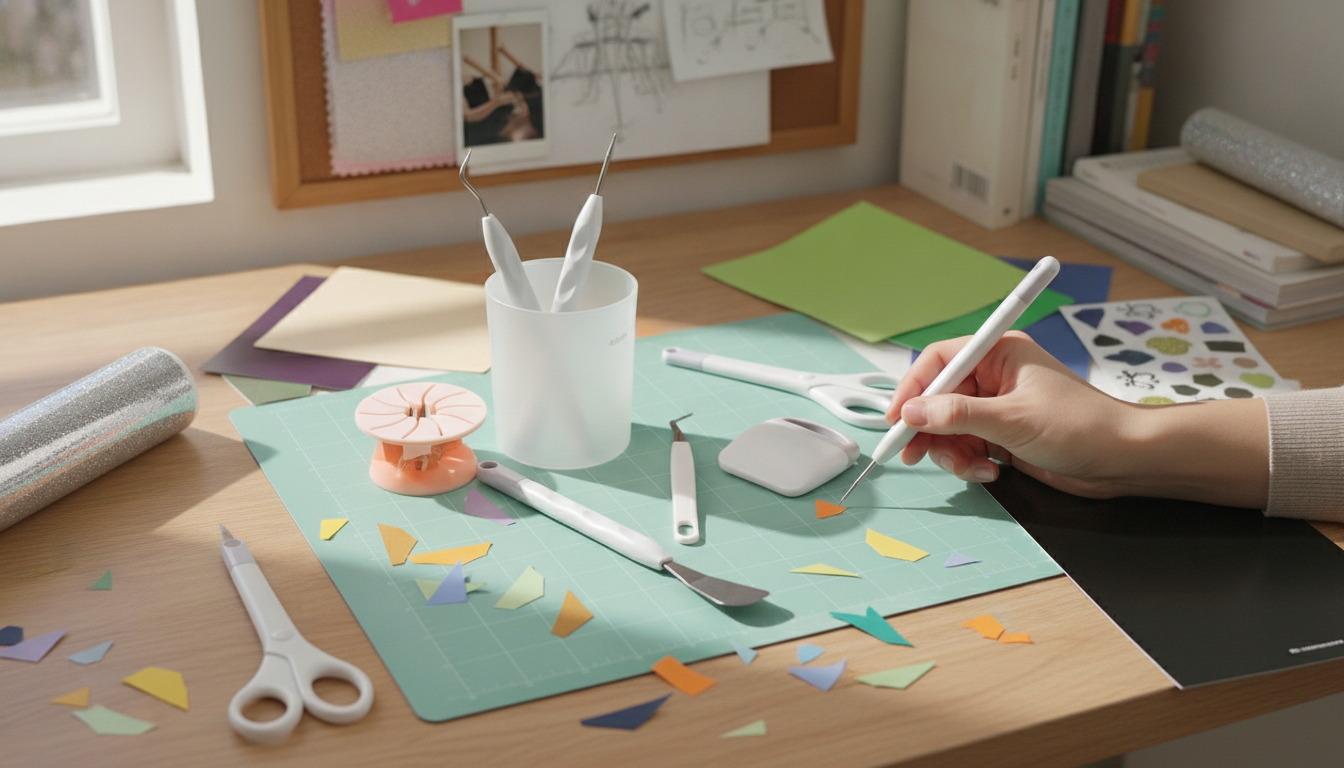
Fromthenon Carving Kit for Sticker & Paper Cutting: Scissors, Tweezers, and Precision Tools
Clean cuts and tidy edges make sticker-making, paper cutting, and small craft projects feel effortless. A compact carving and cutting kit helps handle the fiddly parts—lifting tiny pieces, trimming corners, and shaping details—without tearing paper or stretching vinyl. The Fromthenon Carving Kit combines precision scissors, tweezers, and fine cutting tools so common tasks (snip, lift, carve, refine) feel smoother from start to finish.
What this kit is best for
- Sticker cutting and weeding: trimming around shapes, lifting small centers, and removing backing cleanly
- Paper cutting and cardmaking: detail work on thin paper, cardstock accents, and layered designs
- DIY handmade projects: journaling, scrapbooking, gift tags, labels, and small packaging touches
- Office stationery tasks: neat trimming of labels, tapes, and small adhesive pieces for organization
Tools included and what each one does
- Precision scissors: useful for controlled curves, corners, and short snips where a straight blade would overcut
- Tweezers: lift and place tiny cutouts, remove negative space, and avoid fingerprints on adhesive
- Carving/cutting tools: handle fine details like inside corners, narrow slits, and small cut lines
- Why a set matters: switching between snipping, lifting, and carving reduces torn edges and saves time
If a project includes both long outlines and tiny internal “islands” (like the centers of letters), a single tool can feel limiting. A small set keeps the workflow moving: scissors for the perimeter, carving tools for precision starts/stops, and tweezers for clean removal and placement.
Quick start: cleaner cuts in a few steps
- Prepare the surface: use a stable mat or thick cardboard backing to prevent slipping and overcutting.
- Plan the order: cut large outer shapes first, then move to internal details and small openings.
- Use light pressure and multiple passes: reduces jagged edges, especially on delicate paper.
- Lift carefully: use tweezers to remove tiny pieces rather than fingernails to avoid tearing.
- Finish edges: short scissor snips can refine corners after carving for a polished outline.
For adhesive materials, residue and drag can build up faster than expected. A quick wipe after a cutting session helps your tools glide instead of snag, especially when moving from vinyl-style sticker sheets to absorbent paper stock. For general adhesive handling and safety resources, see 3M’s product and safety resources.
Choosing the right tool for the job
- Curves and rounded shapes: scissors often produce smoother arcs than straight carving strokes.
- Tight corners and inside cuts: carving tools help start and stop precisely without bending paper.
- Tiny pieces and delicate adhesive: tweezers give control for placement and removal.
- Thicker materials: use slower, lighter passes and support the underside to prevent fraying or cracking.
Common tasks and the easiest tool to use
| Task | Best tool | Tip for a clean result |
|---|---|---|
| Trim around a sticker outline | Scissors | Rotate the material, not your wrist, for smoother curves |
| Remove small centers (letters/shapes) | Tweezers | Lift from an edge and pull slowly to avoid stretching |
| Cut sharp inner corners | Carving tool | Make two light passes that meet at the corner |
| Separate layered paper details | Tweezers | Hold the base layer down while lifting the top layer |
| Refine edges after cutting | Scissors | Use short snips rather than long cuts to prevent overcutting |
Safety and care for long-lasting precision
- Work with good lighting: reduces miscuts and prevents accidental slips.
- Keep blades clean: adhesive residue can drag; wipe tools gently after sticker work.
- Store tips protected: avoid tossing tools loose in a drawer to prevent dulling and bent tips.
- Replace or resharpen when needed: forcing a dull edge increases tearing and reduces accuracy.
Cut hazards are easy to underestimate during “quick” craft sessions, especially when hands are close to the blade for precision work. For broader guidance on hand-tool awareness and reducing injury risk, review workplace safety information from NIOSH.
Who this kit suits
- Beginners: simpler handling for common crafting tasks with fewer tool substitutions.
- Hobbyists: faster workflows for sticker sheets, journaling kits, and paper embellishments.
- Students and office users: precise trimming for labels, organizers, and stationery projects.
- Giftable set: practical for anyone who enjoys hands-on crafts and small-scale DIY.
It’s also a solid fit for anyone who prefers a neat, minimal setup: instead of improvising with bulky scissors or using fingernails to weed tiny pieces, the tools help keep edges crisp and surfaces clean.
Product details at a glance
- Product: Fromthenon Carving Kit Sticker Cutting Tools Scissors Tweezers
- Price: $24.65 (USD)
- Availability: In stock
- Best use: precision trimming, lifting, and detailed cutting for paper and sticker projects
Helpful add-on for carrying supplies
If you cut on the go (classes, maker nights, or travel), having a dedicated bag for tools and paper helps prevent bent tips and crushed materials. A roomy option that can hold notebooks, folders, and craft kits is the Waterproof Large Capacity Travel Backpack for Men – 18 Inch Laptop Bag.
FAQ
Can this kit be used for vinyl stickers as well as paper stickers?
Yes—it’s suitable for basic trimming and weeding on both vinyl and paper stickers. Use light, controlled cuts and rely on tweezers to lift vinyl pieces slowly so they don’t stretch, especially with thicker material or stronger adhesive.
How do tweezers help with sticker cutting?
Tweezers grip tiny cutouts and negative space cleanly, which reduces tearing and keeps adhesive surfaces free of fingerprints. That typically improves placement accuracy and helps stickers adhere neatly.
What’s the best way to avoid jagged edges when paper cutting?
Use a stable cutting surface, apply light pressure, and make multiple shallow passes with carving tools rather than forcing a deep cut. For curves and corners, finishing with short scissor snips often smooths the outline without overcutting.


Leave a comment